Showing posts with label Freezer paper t's. Show all posts

Monday, August 12, 2013

{They're Engaged} SQUEEEE!

Hi crafters,

I'm officially back at school today! I've had a wonderful summer. I'm looking forward to NEW school year!
I'm also looking forward to seeing my co-workers.  I'm blessed to have such great people in my school. One of my co-workers got engaged a few weeks ago. I put together a tote bag with a few of my favorite bridal items: a Martha Stewart bridal magazine, ring cleaner, and an engagement ornament.

The tote bag is done with freezer paper, it's a mixture of the Gypsy font and Opposite's Attract.  The flourish is from Teresa Collin's Sophisticated cartridge.

The ornament is Martha Stewart's Elegant Cake cartridge (for the first letter of the names and the "We're Engaged" sentiment) The lower case letters are from Opposite's Attract.

The silhouette on the card is from Sweethearts. The background is embossed with the cuttlebug.

Thanks for stopping by,

Sunday, February 17, 2013

{disney} preparations

Hi crafters,

We had my niece's birthday party today.  She and her cousins are headed to Disney in a few months, this made crafty gift giving quite easy.

I made this count down with my bind it all.  The numbers are the cricut craft room font and the letters are from Lyrical Letters.

 I cut the white cardstock at around 2 inches and covered the chipboard with red paper.

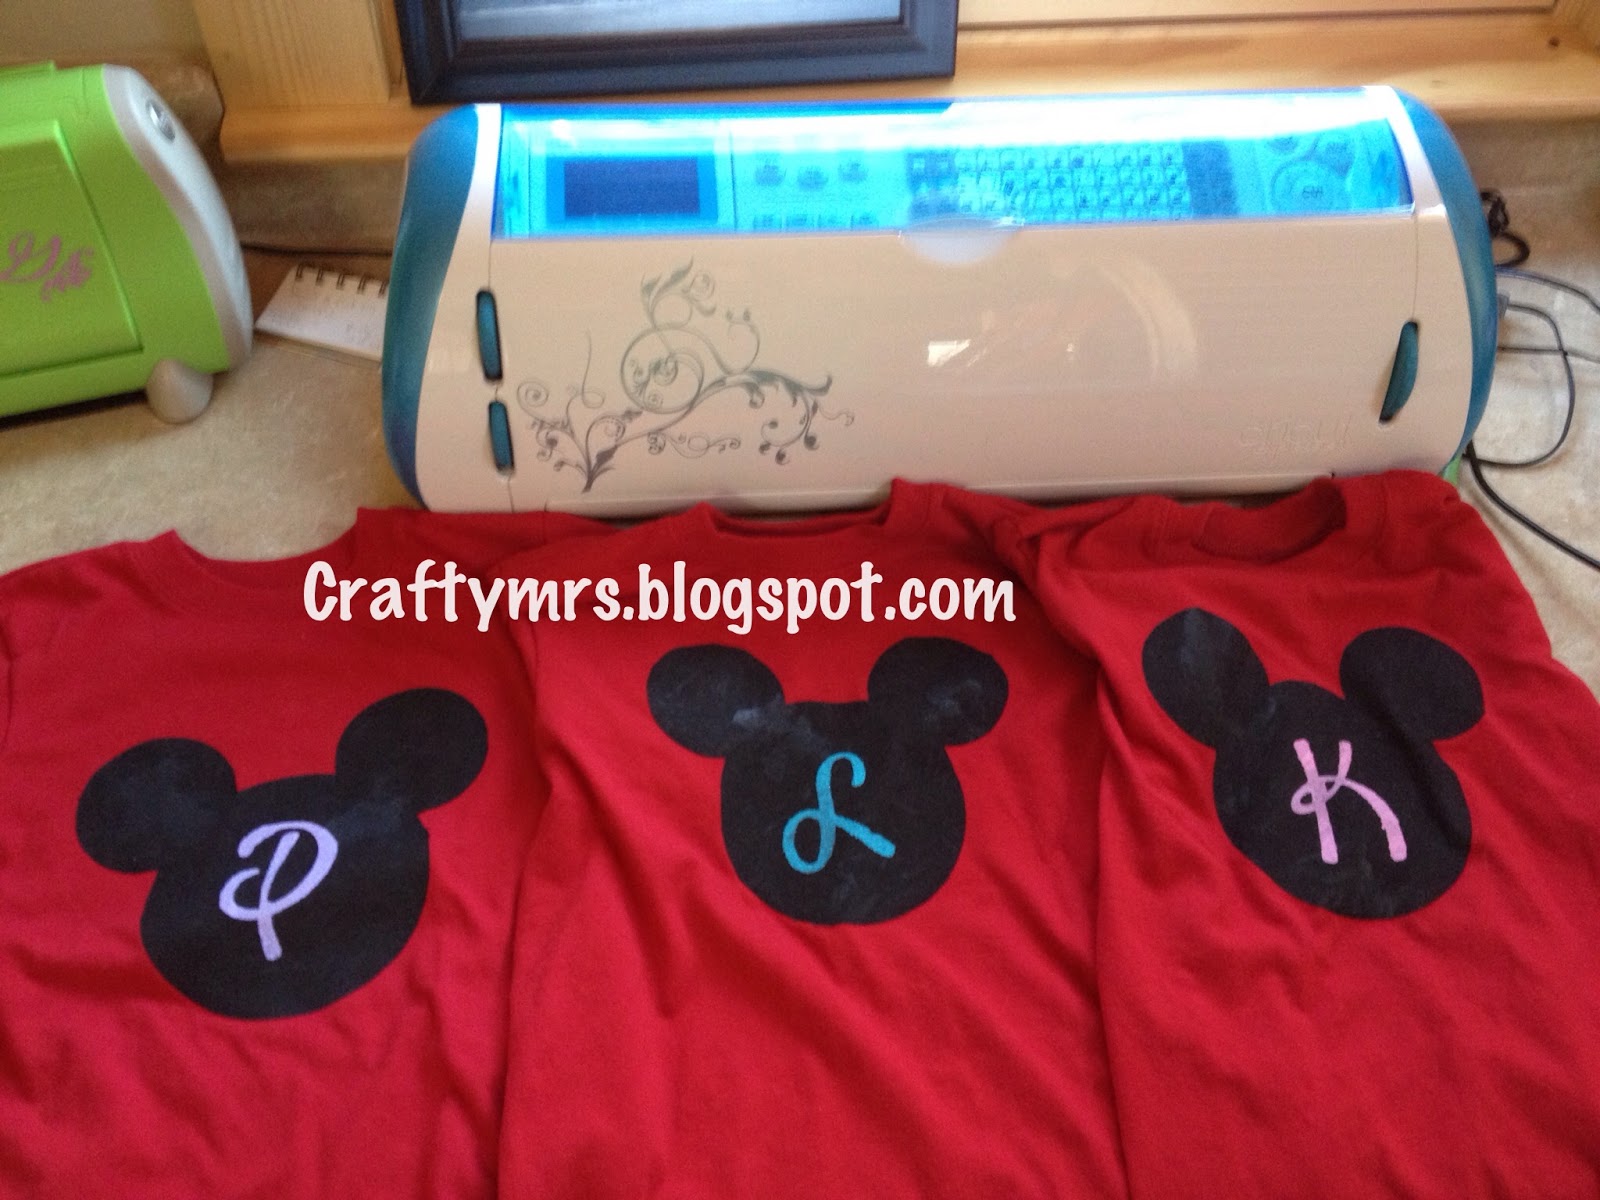
 I got matching shirts and used freezer paper to make the Micky heads.  I didn't have the Disney cartridge with it so I just used the head from a cart I didn't have and grabbed three circles and sized/welded them over top of it before deleting the original.

I created these autograph books for them to take to the park.  I covered chipboard with paper and used white computer paper inside for the pages.

The crowns are from Paper Doll Dress Up.  The Micky head was created using the same method as above.

I used fun paper inside the covers and did the reverse for the back covers.


Happy Crafting,

Saturday, June 23, 2012

Pillows for the Kitchen

Hi Crafters,


I've been using my sewing machine to make some pillows to put on the bench that goes with the kitchen table.


The wood grain fabric and the twill both came from Joann's.  The duck fabric (far left) is from a local overstock store.
I used some of the decorative stitches that my Husqvarna Viking Emerald 183 offers to embellish this pillow.

This pillow was created with freezer paper and the Teresa Collin's Sophisticated cartridge. I have just about gotten to the point that I am fairly comfortable with my sewing machine.  It's nice to be able to just use it and not fret about what could go wrong.

Happy Crafting,


Sunday, May 27, 2012

How to make a Bridal Shower/Bachelorette Sash

Hi Crafters,

I made a similar sash a few months ago for a friend.  I thought for this round I would make a picture tutorial.
I gathered up the supplies.  I used freezer paper for the stencil and a wide satin ribbon.  I used tulip soft fabric paint for the letters.

Using a die cutter or an exacto blade (tracing over a computer print out) cut out your letters. If using a die cutter I would suggest putting the freezer paper shiny side up and reversing the letters.  The capital letters are from Martha Stewart Elegant Cake cart and the lower case letters are from Opposites Attract.  The settings I use on the cricut are typically 3 speed, 3 pressure,and 3 depth.

Remove the letters from the mat but be sure to leave the insides of the letters.  I find leaving the centers on the mat until I am ready to place each one helps me remember where they go. Position the negative of the image over the ribbon.  Iron that on a acrylic setting on the iron.  Carefully put the centers of the letters in the correct spot and iron those in place.

Using a foam brush dab the paint (DO NOT USE A "painting" motion or it will bleed).  Go back over any thin spots.  Freezer paper doesn't stick to the satin ribbon very well so I find you can really only get 1 good coat.  I did have a little bleeding on this one and wonder if I would have used the not as shiny side if that would have helped.  Let the paint dry then remove the freezer paper.

 I used the Jolee's heatafix tool to add some gems to the letters.
You have a few options for finishing the ends.  If you are not a sewer melt the ends with a match so it won't fray then tie together or tie with tulle.  I sewed the ends together on this one and added some tulle to make it adjustable.

Thanks for stopping by!

Happy Crafting,


Tuesday, February 28, 2012

Bachelorette Sash

Hi Crafters,

I used freezer paper and wide ribbon to make this sash for my best friend and bride-to-be.  I used the Martha Stewart Elegant cake cart for the B and Opposites Attract for the rest of the letters.  The ring is from Sweethearts


 The bling is attached with the Jolee's Heatafix tool.  I tied the ends with tulle to make it adjustable.  I then heat sealed the ribbon with a burning match to prevent fraying.

Thanks for stopping by!
Happy Crafting,


Wednesday, August 3, 2011

Freezer Paper Totes

Hi Crafters,
Here's a few tote bags I made this week.
The font is from Lyrical Letters and the lady bug is from Walk in my Garden.  She's too young for buttons and googley eyes still so I kept it simple.  The bag is a mini tote bag so it will be perfect for this little girl.  Michael's had them on clearance for .79, it was in the section with a bunch of other summer items.
This is another gift for a bride-to-be.  I used my Jolee's Heat Affix tool to add some bling.  The swirls are from Gypsy Wonderings and the text is from Songbird.

If you are interesting in making your own freezer paper totes/tees check out my picture tutorial here.

Happy Crafting,


Tuesday, July 12, 2011

Beautiful Lengths

Hi crafters,

I can't believe summer is well on its way!  This post is long overdue!  My co-worker and I issued a challenge to our school.  We have two teams (think Harry Potter) green and gold and MANY opportunities for the students to earn points through out the school year.  We challenged the teams to see who could get the most points by the end of the year.  We agreed that who ever lost would get their hair cut by the winning team's teacher.  Team green won but I ended up also donating as well.  We chose to donate to Pantene Beautiful Lengths.  We each cut about 8 inches off.

Believe it or not this post DOES have a craft purpose!  I wore a custom freezer paper T made with Plantin Schoolbook.  The back side says "Gold is Green with Envy"

Here you can see our cricuted banner.  We used the Heat and Bond Ultra Hold to make this banner.  The background is felt and the letters are cotton.

This picture I slightly cheated.  I took this picture today after going for a trim so this was not the original hair cut but very close to.  My salon just started feather extensions so I had my amazing stylist throw one in for fun.  This was my 4th hair donation, and because most places will not take hair that has been processed I thought this feather would be perfect!  It should last about 4 months.

I just purchased a Yudu machine and tried it out for the first time last night! Pictures to come :)

Happy Crafting,


Friday, June 3, 2011

Freezer paper t upgrade

Hi Crafters,

I visited Old Navy last weekend and they had their classic t's on sale for $3.00 in a bunch of colors.  I picked up several thinking I freezer paper paint t-shirts from Michael's all the time...why not these?  It would be a step up from just a cotton shirt.  I admit I was nervous, but reminded myself that I only paid .50 more for this shirt than the Michael's shirts I typically do without many issues.


I found a design I liked on the Sweetheart cart and cut it at about 10 inches.  I ended up positioning it on the seam of the shirt with most of the design on the lower front portion.  I used some cuttlebug dies to weigh down the freezer paper, it tends to roll when you have larger pieces.  I then ironed it on a medium high setting.
I used tulip fabric paint I mixed this fantastic aqua color with a bit of white to tone it down and coordinate better with the blue shirt.
Let it dry and remove the freezer paper (I rushed mine a bit and had some slightly unfinished edges as a result).  I rocked it the next day to school.  I have plans to do the other shirts over the next several weeks. I have 1 more full day of school and 4 student half days/teacher half work days left! C'mon SUMMER TIME!

Happy Crafting,


Thursday, February 10, 2011

Birthday Outfit

Hi Crafters,
Here is the outfit I have put together for Miss Penelope this weekend.  I did a no sew tutu and made a freezer paper onesie for her.  She's going to be queen for they day!


The kitty face was made with the silhouette feature on Hello Kitty Greetings and the font is from Lyrical Letters.

Happy Crafting,

Friday, October 29, 2010

The Apple Doesn't Fall Far From The Tree

Hi Crafters,

Happy Friday!  We are wrapping up Spirit Week at my school.  I have always enjoyed getting into the school spirit so it has been a fun but crazy week!

The teachers at our school dress up as idioms for Halloween.  This year I took it to another level with the cricut.  My mom and I teach at the same school so we took advantage of the mother daughter relationship and came up with a 2 part idiom.  I made freezer paper t's for us. Hers says "tree" and mine says "apple" (darn my long hair ruining this quick photo snap).  I even have a little worm (from Sesame Street Friends) with a googly eye on my sleeve.  My headband has two leaves cut out of Home Accents.  The font for the shirts is from A Child's Year, the tree on my mom's shirt is from Give A Hoot, the apple on the bottom of my shirt is from Hello Kitty Greetings.  I'm so lucky to have a mom that is just as in to school spirit as I am!

What a fun day!

Happy Crafting,

Wednesday, July 8, 2009

Freezer Paper Ts


I have embarked on a huge endeavor. I am making freezer t's for my upcoming mission trip with my Youth Group. We are headed to Mescalero, New Mexico a week from Friday. Our theme for the week is "Reveal"

I purchased my freezer paper from Kroger's (Although I saw 2x as much for a little more money at Walmart the next day). This is not to be confused with wax paper. It is white and one side has a waxy finish.

I ripped sections of freezer paper then stuck it to the mat to cut it down

I used my cricut create on medium (3) speed, depth, and pressure. I put the wax side up and used the flip feature. Remember to type your word backwards so that when you peel it up and place it on your shirt it will read correctly.

Remember to save the center part of the letters (I needed to save the little center of the Es and A) I used a font that did not cut the center part of the R so I didn't have to save that since it was already attached.

I used Lyrical Letters and this is cut at 3 inches with the paper saver feature on.

I pre-washed all of the shirts.

Then I ironed on the decal and center parts of the letters.


Make sure you put the waxy side down when you iron. Also make sure you seal the edges well so the paint won't seep to other parts.

The freezer paper is much wider than what the create needed so I saved the scraps to put inside the shirt to prevent bleeding.

Next I painted since I wanted a fade effect I used 3 colors starting with white.
I used a foam brush with a dabbing motion rather than a painting motion.


Then I painted the periwinkle color

Then I used the navy blue on the bottom

I let it dry for 15-20 minutes and added a second coat and third later if needed. The lighter colored shirts did not need quite as much paint.


I couldn't wait for the black shirt to dry so I took a picture of one I did last night. You need to wait for the paint to dry completely before peeling the freezer paper off. I let the yellow shirt sit over night but I wait at least an hour after applying the last coat before peeling the paper off to "reveal" your design (sorry couldn't pass up on a theme joke).